User Guide
Last Update: April, 2018
Version v6.0.0
| Home | Carrier | SIP User | Cloud Client | Gateway | Dial Plan |
| Profile | Utility | Active Calls | CDR | Scheduler | Glossary |
Greetings!!! Welcome to the Cloudfonica Client Panel v6.0.0,the most advanced & dynamic panel ever built!!!
We would like to Introduce you with many new and interactive features of Cloudfonica Client Panel v6.6.0 for managing your PC based, Pi based and Router Solution. We will describe the latest features & interface one after another:
Home:
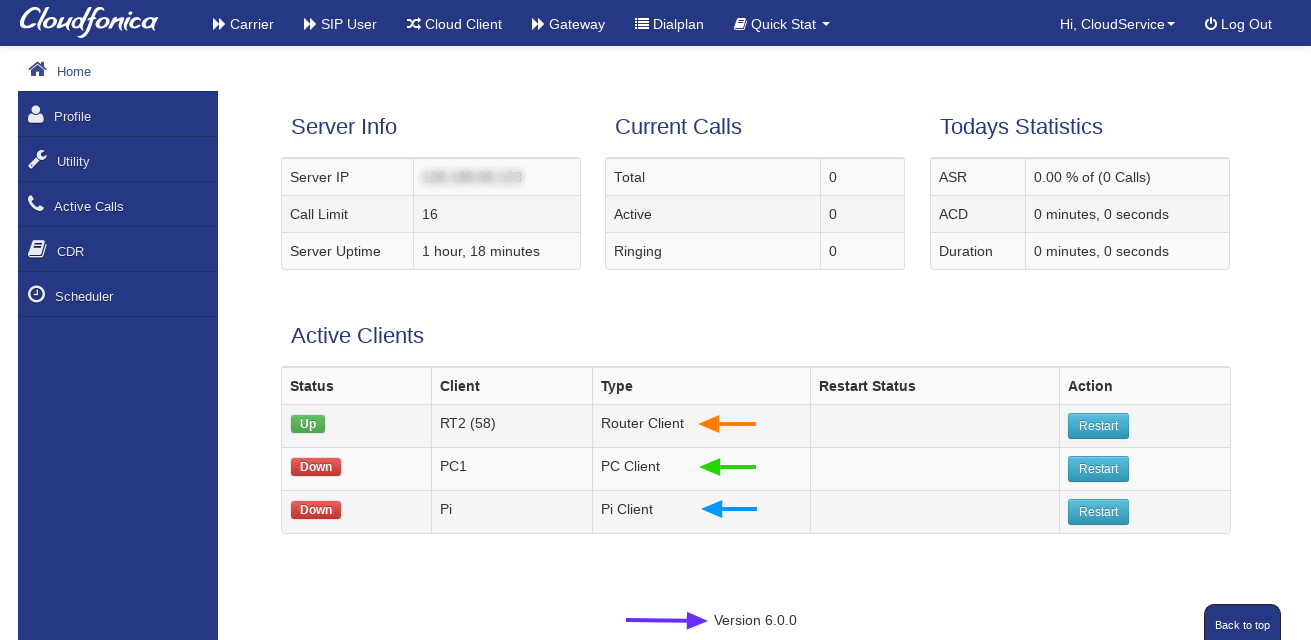
Cloudfonica Client Panel v6.0.0 got an Informative home page. Here you may see the required information at a glance. Figure 1 is showing the home page as:
- Server Time is shown with timezone, date and time.
- Server info: Server IP, Call limit (Our previous drawback was our system can handle 128 ports/call limit, now there is no limitation) Server Uptime.
- Current calls: Total, Active, Ringing.
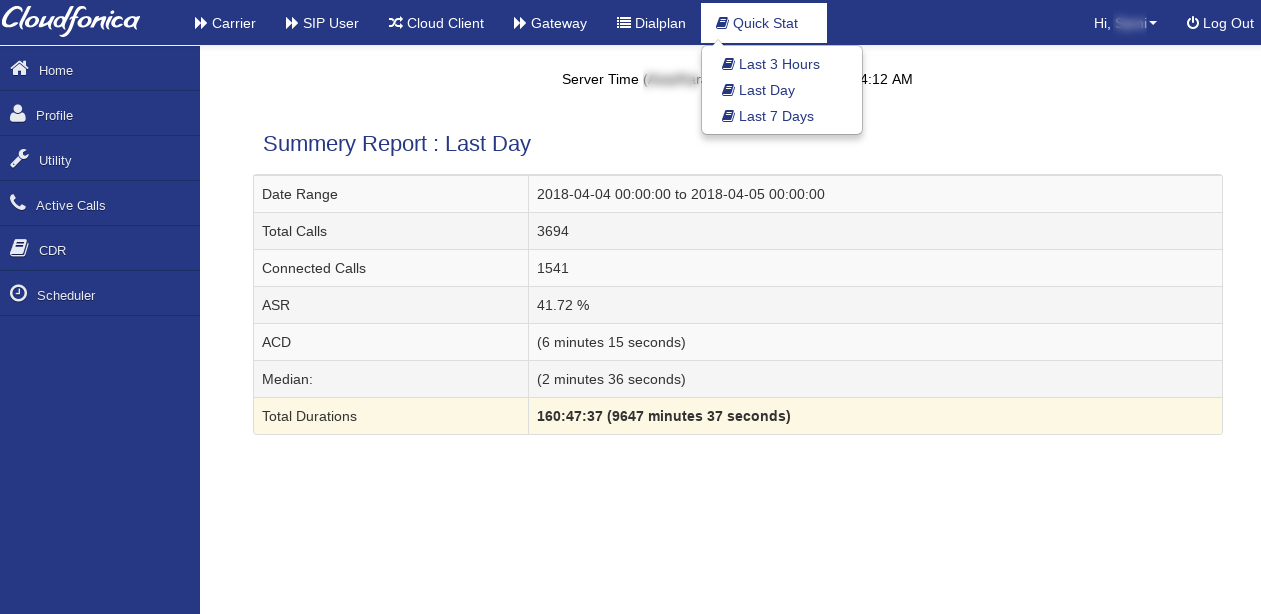
- Today’s Statistics: ASR ACD, , Duration shown, also you may check last 3 hours ACD or last day ACD, or last 7 days ACD from Quick Stat of Top Menu
- Active Clients: Up(green)>client pc is IP, Down (red+pending)>client pc is down, Down(red)>communication between server and client pc is being interrupted e.g. by ISP net/ protocol blocking.
- Cloudfonica Client Panel v6.0.0
- After your work done, don’t forget to Logout for your own security.
Carrier:
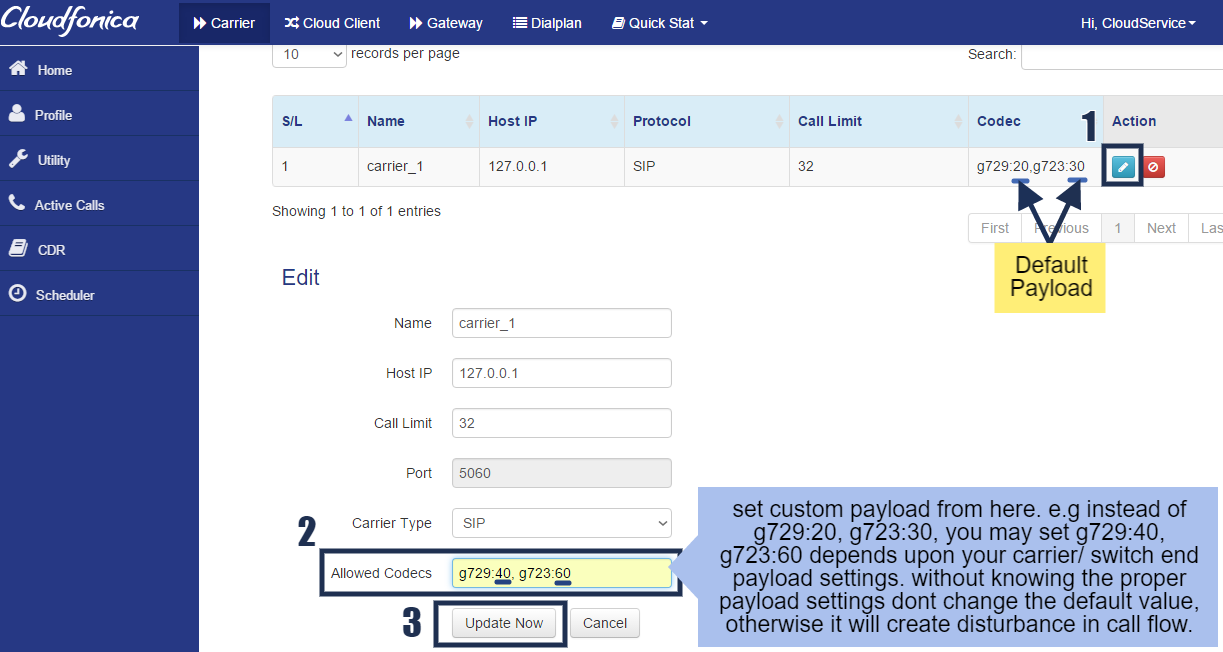
In this segment carrier information can be added as usual but the interesting part is,now you may also define & control the codecs from Cloudfonica Client Panel v5.0.0. This awesome feature will provide you more control over the codecs which you may want to receive from your carrier end. Figure 2(shown). Carrier type must be SIP here and port 5060 only.
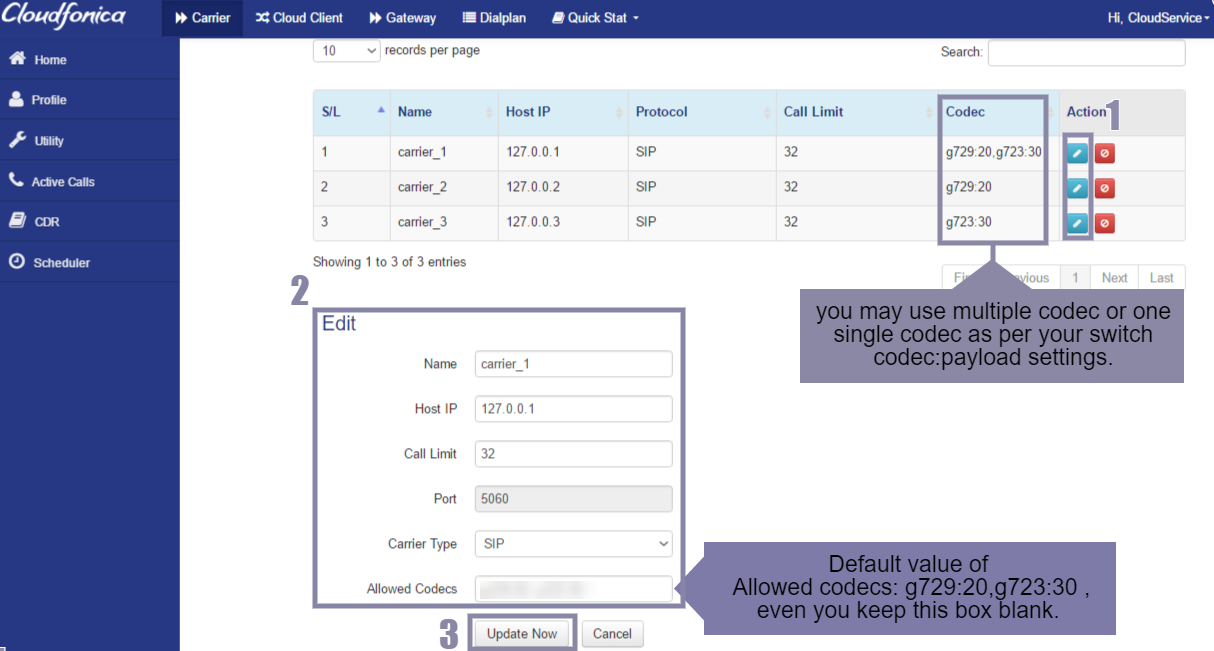
I will explain how you may do it, in following section:
Here, in Fig 2 we can see the option Allowed Codecs
- Here, by default g729:20 & g723:30 codecs are allowed. g729 is the codec here and 20 is the payload. you may set a single codec here also like g729:20 only or g723:30 only, depends upon your carrier side codec: payload settings.
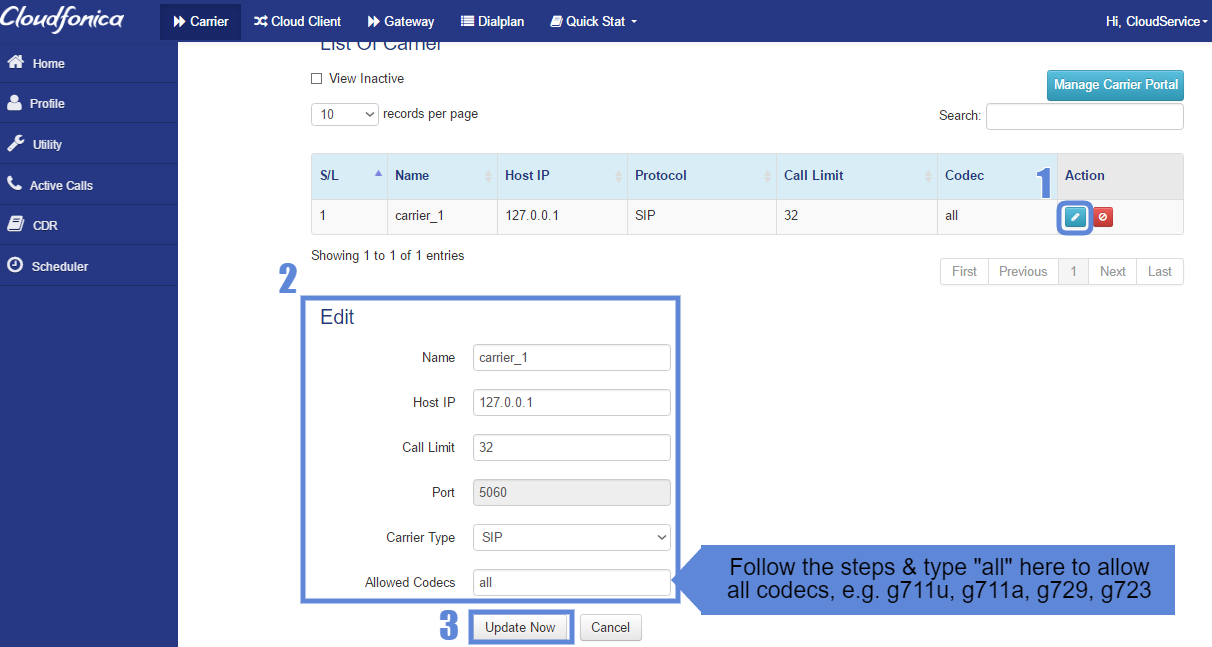
- If you want to allow g711 codecs then we may do it by typing “all” in the allowed codecs box, so that all codecs will be enabled e.g: g711a , g711u, g729 , g723 , shown in fig 3.
- You can change the payload if required. like g729:40 and g723:60, shown in fig 4.
Codec Payload Size
| Codec | Payload Sizes (ms) default in bold | Profile Used | Payload Type | Base Rate (ms) |
| G.711 u-Law | 10, 20, 30 | 4,5,7 | 0x00 | 5 |
| G.711 A-law | 10, 20, 30 | 4,5,7 | 0x08 | 5 |
| G.723 53k | 30, 60, 90 | 5,7 | 0x04 | 30 |
| G.729 A/B | 10, 20, 30, 40, 50, 60 | 5,7 | 0x12 | 10 |
SIP USER:
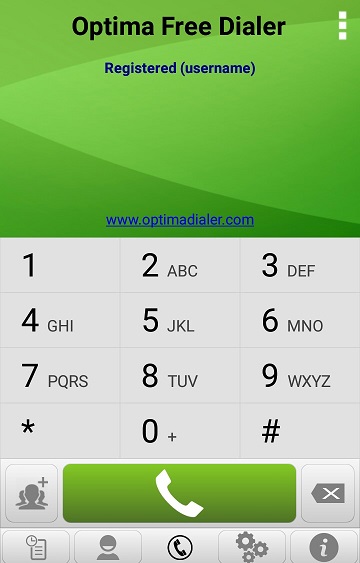
Splendid!!! Now you may create sip users directly from our Cloudfonica Panel and test calls through any mobile sip dialer. Steps for creating sip users are:
Provide input for
- user-name
- password
- Call Limit
- Codec
- Save Now
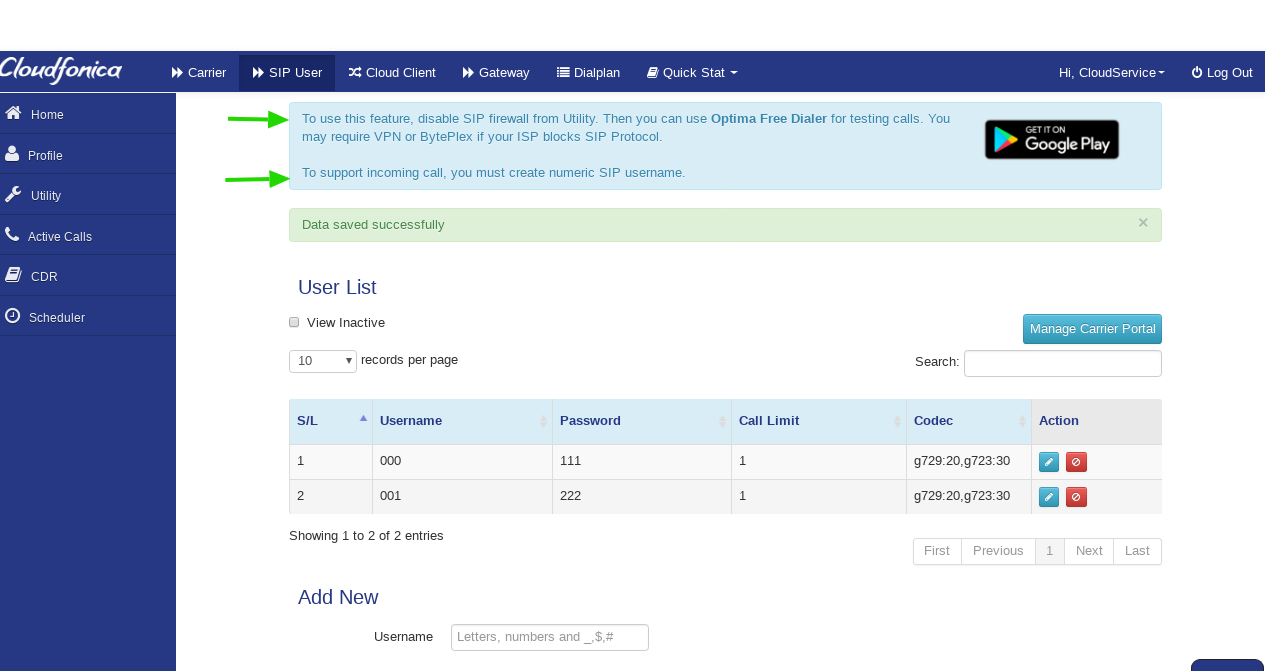
Now will explain the steps for making calls:
1. From Utility , disable firewall
2. Reload All Settings

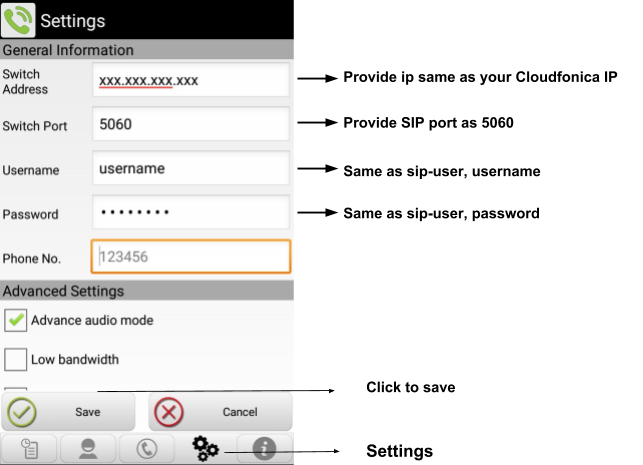
3. Please download Optima Free Dialer from play store and open the settings of the dialer, put your Cloudfonica ip as your server/ switch ip, user-name and password just like you created above and save settings in dialer.
6. See the Current Call/ Call log from Active Calls/ CDR
7. After testing the call please enable firewall, to test any call you must disable the firewall, otherwise dialer will not be registered
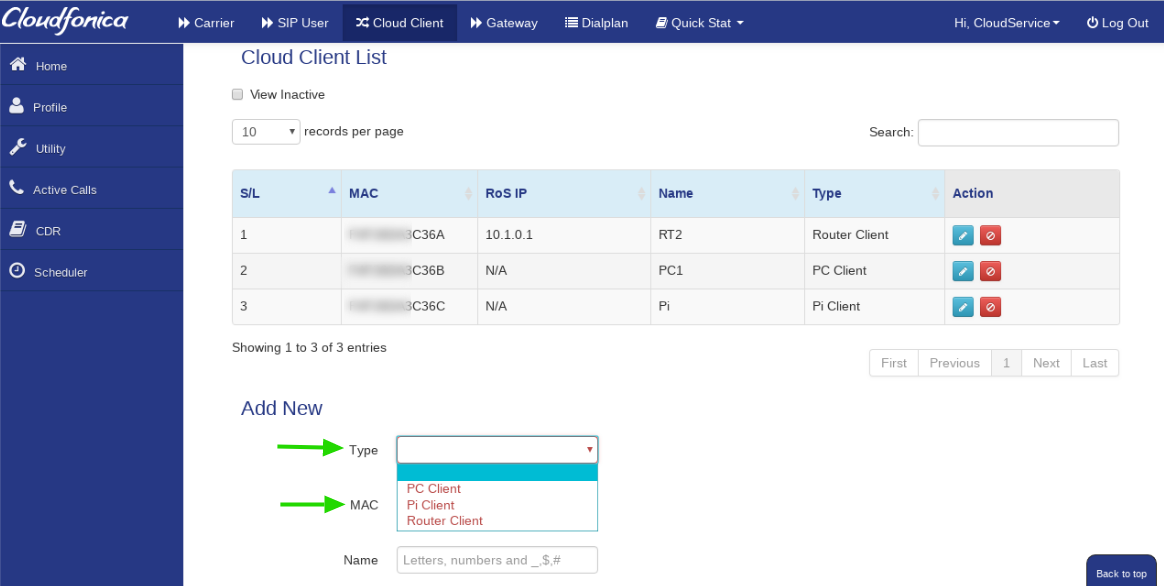
Cloud Client :
In Cloudfonica Client Panel v6.0.0, Cloud Client section, clients may add the MAC Address of PC , Pi and Router along with other related info, which are mandatory according to his solution type. Also can enable tunnels on PC and Pi only, for Router , that have in-build tunnel. If clients face any sorts of protocol/ port blocking with the internet/ ISP, they may use, e.g.:
➔ SX , TX(new port added 5967), UX
TX tunnel got multiple range of ports except for SX and UX only.
Here we will explain how to install firmware and configure router
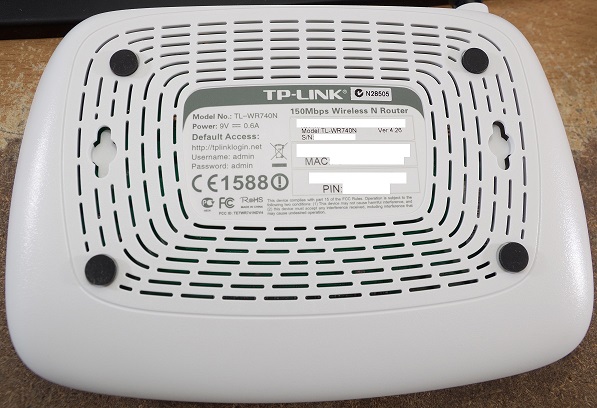
- Get the Mac: Please check your router’s backend and get the mac address.
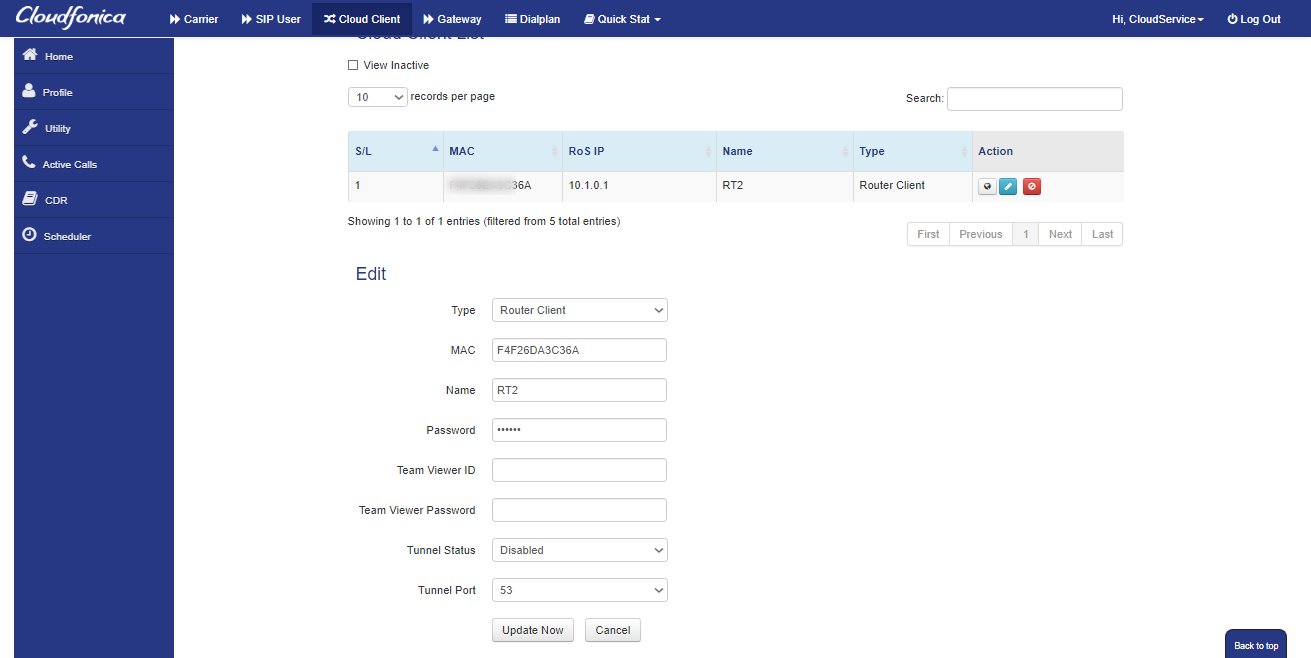
- Then type the mac address and other related field as per necessity , then click on update now to add the router related info in our Cloud Client
- Router Firmware download: Please send ticket from your portal to our support , mentioning your router model and version. You may see the list for supported router models from here: https://wiki.openwrt.org/toh/start. For example: if you have Tplink MR3420(model) V3 (version), Send ticket to support like:
“Dear Support,
Please provide me the router firmware download link for the router TPlink MR3420 V3.
Thank you.”When you get the firmware, download the firmware from the link.
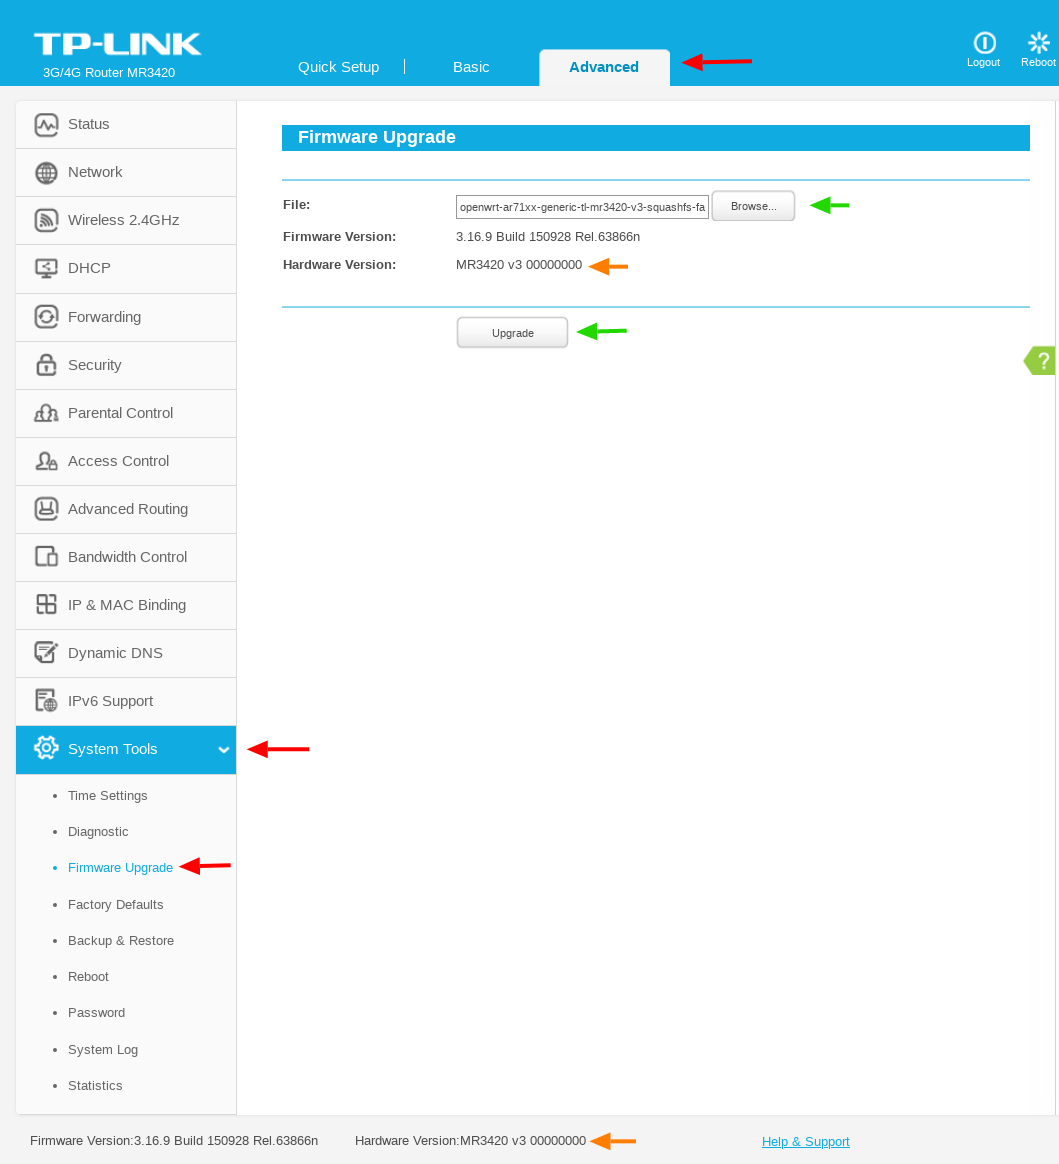
- Router Firmware Installation: Once you will download the router firmware you are ready to upload and install the Router firmware. There are 2 ways to install router firmware:
- From Router’s Web Panel, if failed then follow next with tftp.
- With TFTP
- From Router’s Web Panel: Its really easy to upload the Router firmware from Router. Open router’s web panel with 192.168.0.1 or 192.168.1.1, it varies router to Router.
- First, go to firmware upgrade page in router.
- Then browse for the Router Firmware, which you have downloaded earlier from step no 3.
- Then click on upgrade. Router system will upgrade the firmware with our Router firmware.
-
-
-
- Now please connect internet in the wan port of the router and check your panel if router status is showing green or not.It may take 5/10 mins after router gets internet. You may also restart router system from Our cloudfonica panel too.
- If you see any error immediately while updating the router firmware when you click on update, please follow the below procedure with tftp.
- With TFTP.
- Download and install TFTP server. It will ask for Firewall permissions which you should grant for it to work.
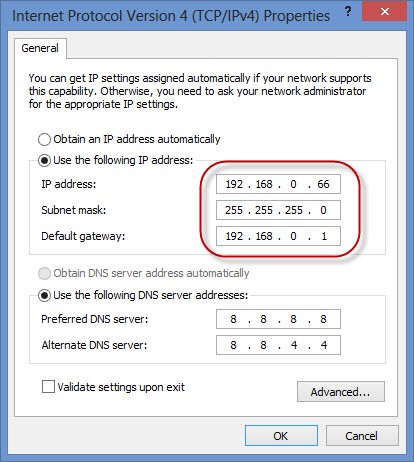
- Open Network settings in Windows control panel. Change the network adapter settings (the network adapter that is wired to your WiFi router) and set the static IP address to 192.168.0.66, subnet mask to 255.255.255.0 and default gateway to 192.168.0.1. Save the settings
-
-
-
-
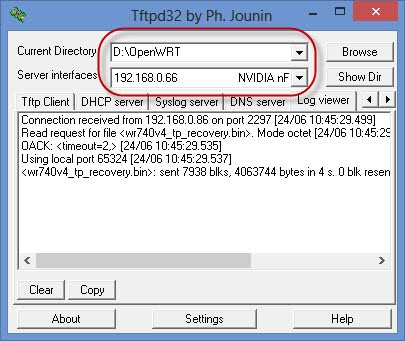
- Change the file name of router firmware to exactly mr3420v3_tp_recovery.bin. Open TFTP server and change the working directory to where the is copied. Change the server interface to 192.168.0.66
- Power off your router. Press the reset button of the router and power it on. Do not release the reset button for 4-5 seconds after powering it on. As soon as you release the button, TFTP server shall flash the firmware and start the router
- Now when tftp is done, you may connect internet in the wan port of the router and check in panel, if router system is up not. If router status shows , green that means Router Solution is up. Now you are ready to add carrier ip , gateway, dialplan in our panel for sending calls.
-
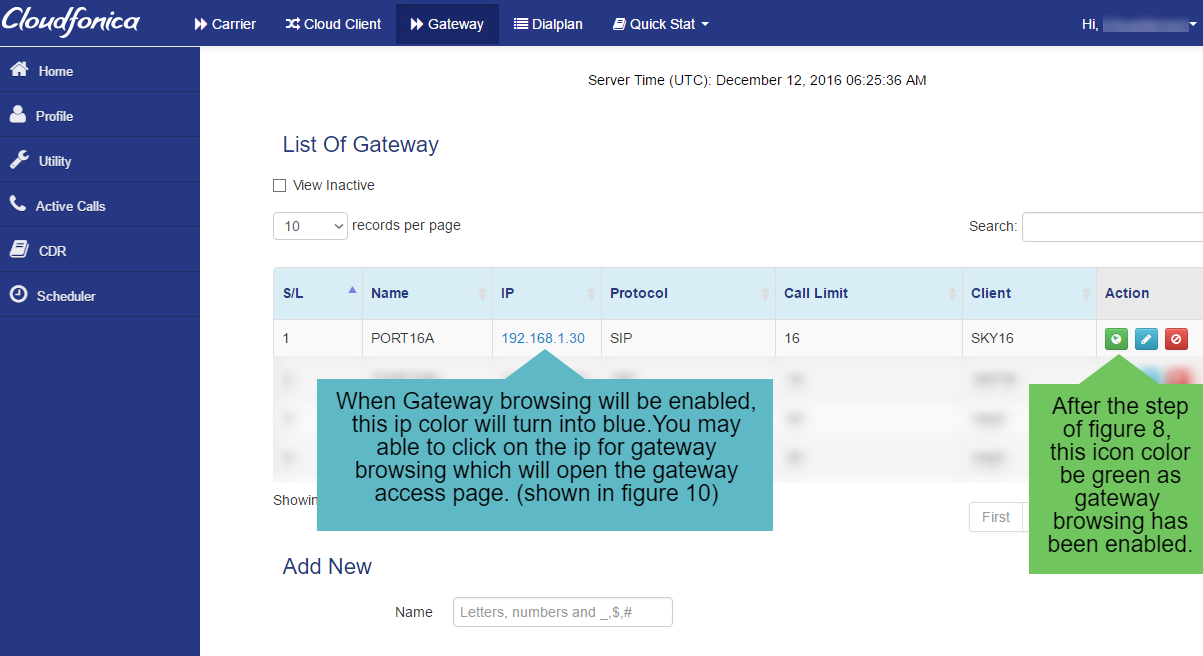
Gateway:
In Cloudfonica Client Panel v6.0.0 gateway section, we have introduced some effective features (figure-7) e.g:
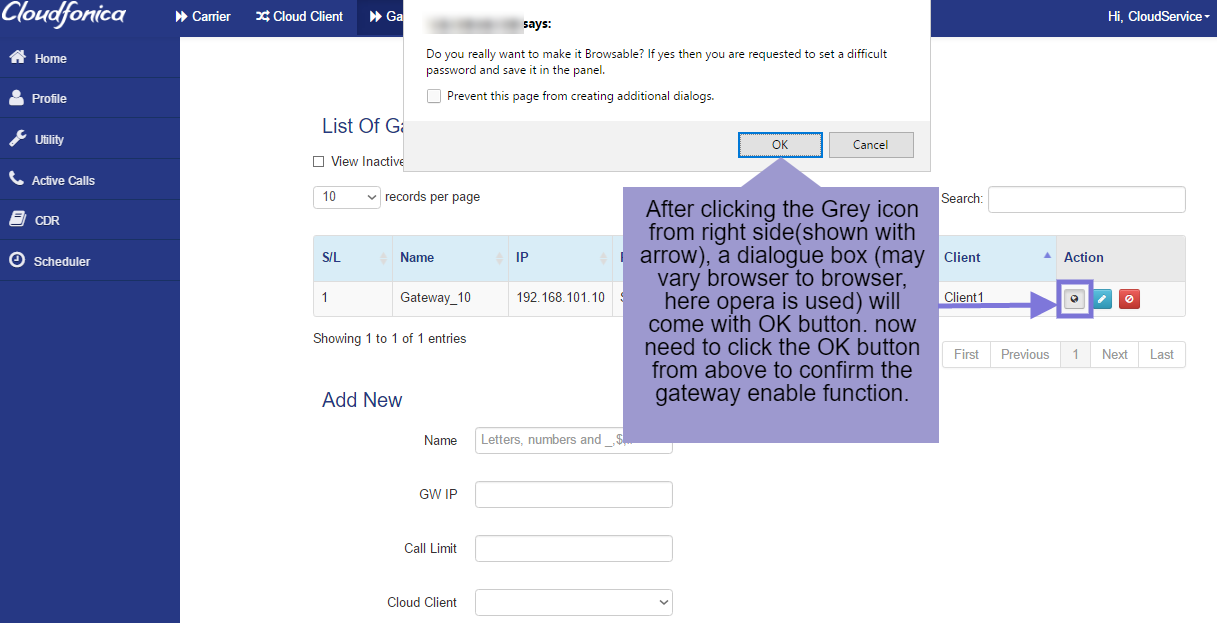
- Gateway Browsing, feature in an unique feature which can be enabled with the icon in the action section, shown in figure-11
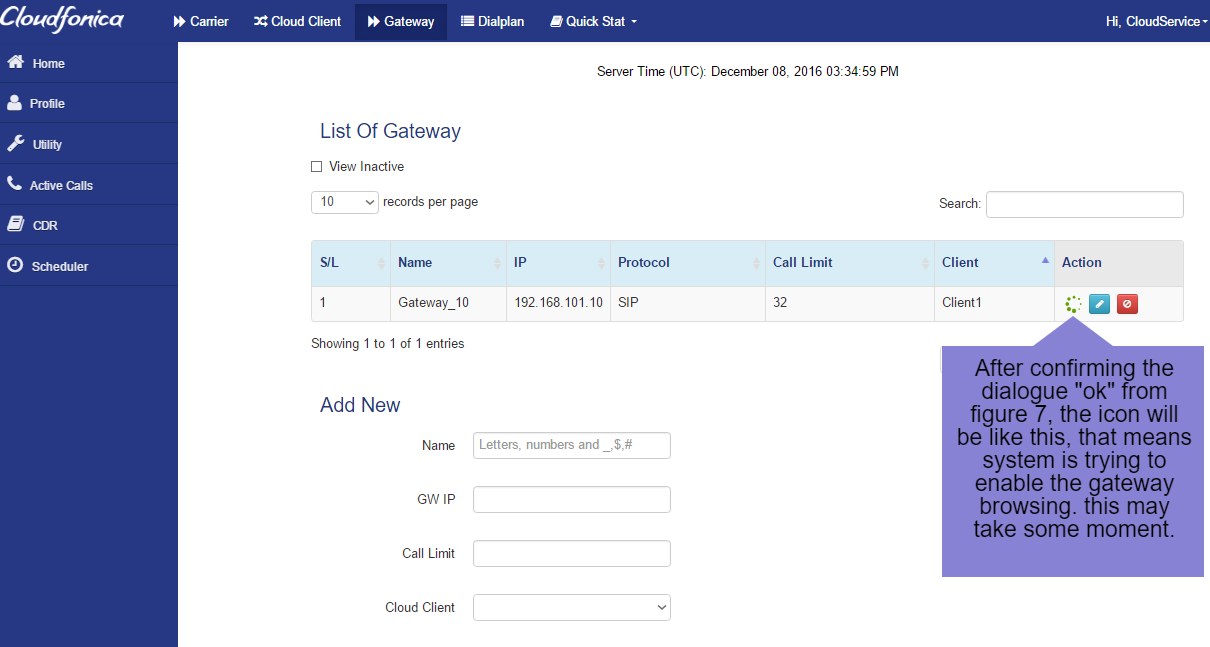
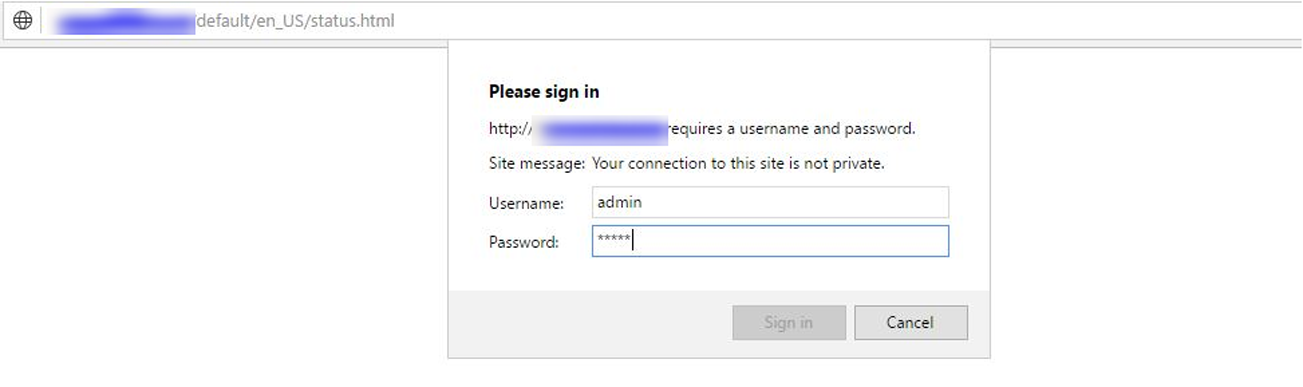
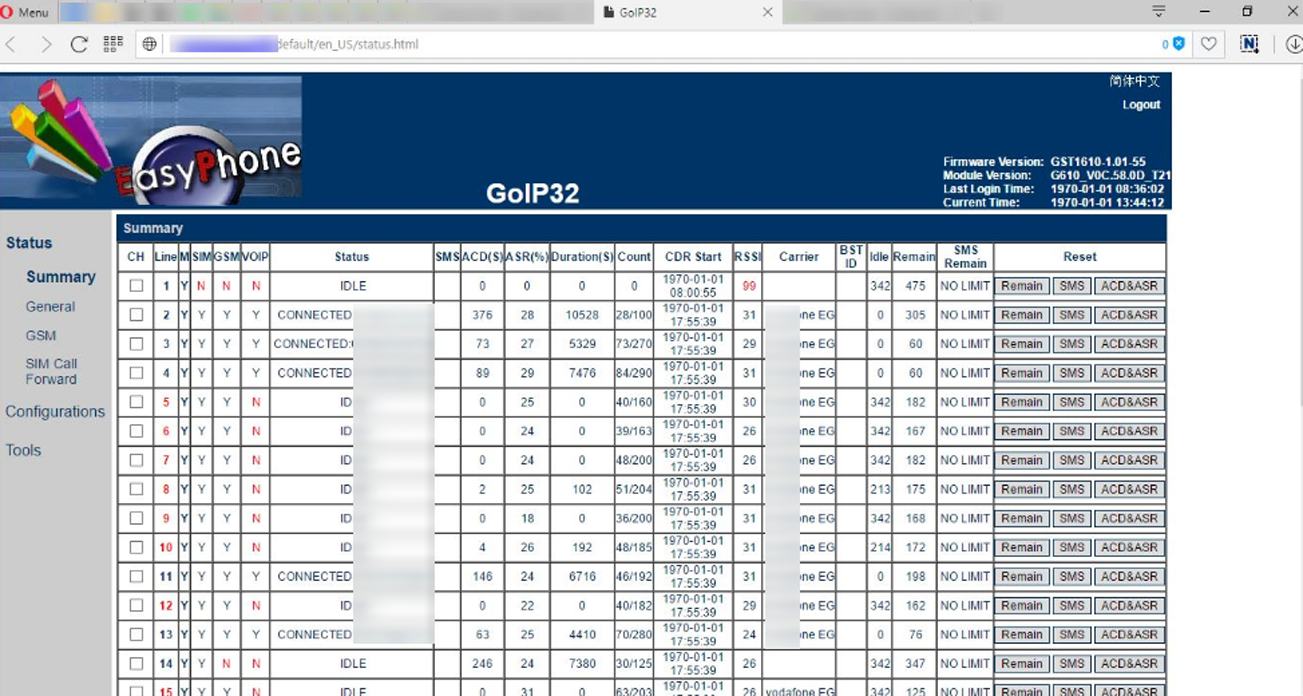
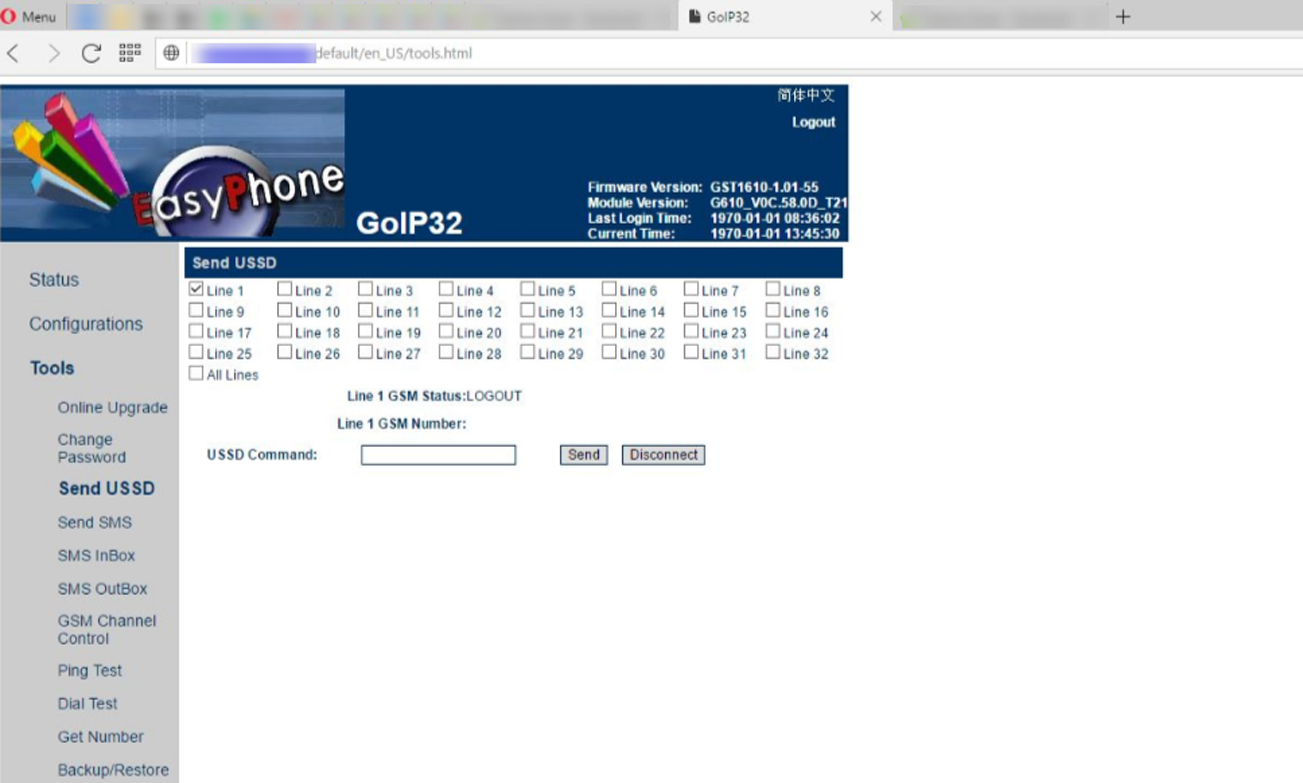
From now on wards, you may browse your gateway from here which ips are added in gateway section. Once it is enabled ( it may need up to one minute) it will be disabled by system after 30 minutes for your security. you may again enable it when you will need it, shown figure 12 to 17.
ATTENTION: if you want to enable this feature you must have to set strong password in the gateway access password section, e.g: (user: admin, pass: 1@Admin1). There is a box named Login Info, there you can save the gateway access info for the gateway (figure 11)
Benefit: when teamviewer is blocked by ISP, then Gateway Browsing option will be so much effective. - Another new feature, like Login info where you may save your gateway access username and pass for gateway browsing.
Splendid! isn’t it.

Dialplan:
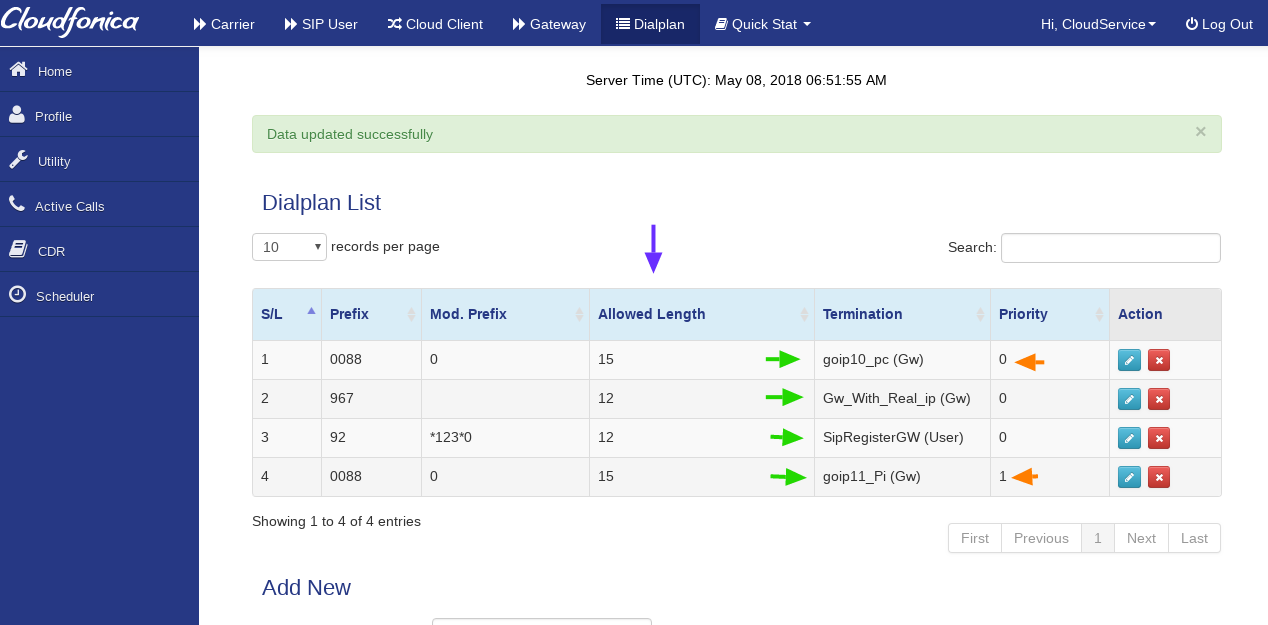
In Cloudfonica service Panel v6.0.0 dial plan segment, we have Introduced some effective features which you may utilize as per your necessity:
- Prefix Manipulation:
- You may use null value as mod prefix for some countries trunk prefix is null like 967 (yemen cellular), here truck prefix is not 0, now you may keep the mod prefix blank, it means prefix will be fully stripped.
- From now, you may use special characters, like _, #, $, * and + in the prefix and mod prefix field. e.g: for some package sim dialing options with special characters, like 92> *123#0, you may use it, depends upon bundle offer from your operator
- Priority – Here the priority works just like any other switch. Calls will jump to next priority in ascending order. e.g: priority 0 means, calls will hit that termination first, priority 1 means, calls will hit the termination if any call fails/ rejected from priority 0 termination and same rule will apply priority wise for priority no 2, 3, 4 etc.
- Allowed Length – is a very effective feature which will allow, to pass the calls with the exact length of the number digits provided here. e.g: suppose calls will come with 008801212033220, this number have 15 digit. SO allowed length will be 15. No calls will pass less than or more than 15 digits. Allowed Length option, will prevent the unwanted junk calls with wrong number format.
So, now from Cloudfonica
- You may send calls to GWs behind Nat, through our PC/ Pi/ Router Based Solution, which will reduce your bandwidth consumption & take care of all sorts of ISP blocking e.g: SIP blocking, UDP blocking.
- You may send calls to directly to any Real IP. It can be any GW or Switch
- You may route calls to any GW/ Mobile Sip Diale which is registered via sip with our Cloudfonica from our Sip User section.(N.B: Set “Sip firewall” as off & set “Route to sip user” as ON from our utility segment to register and send calls to sip user)
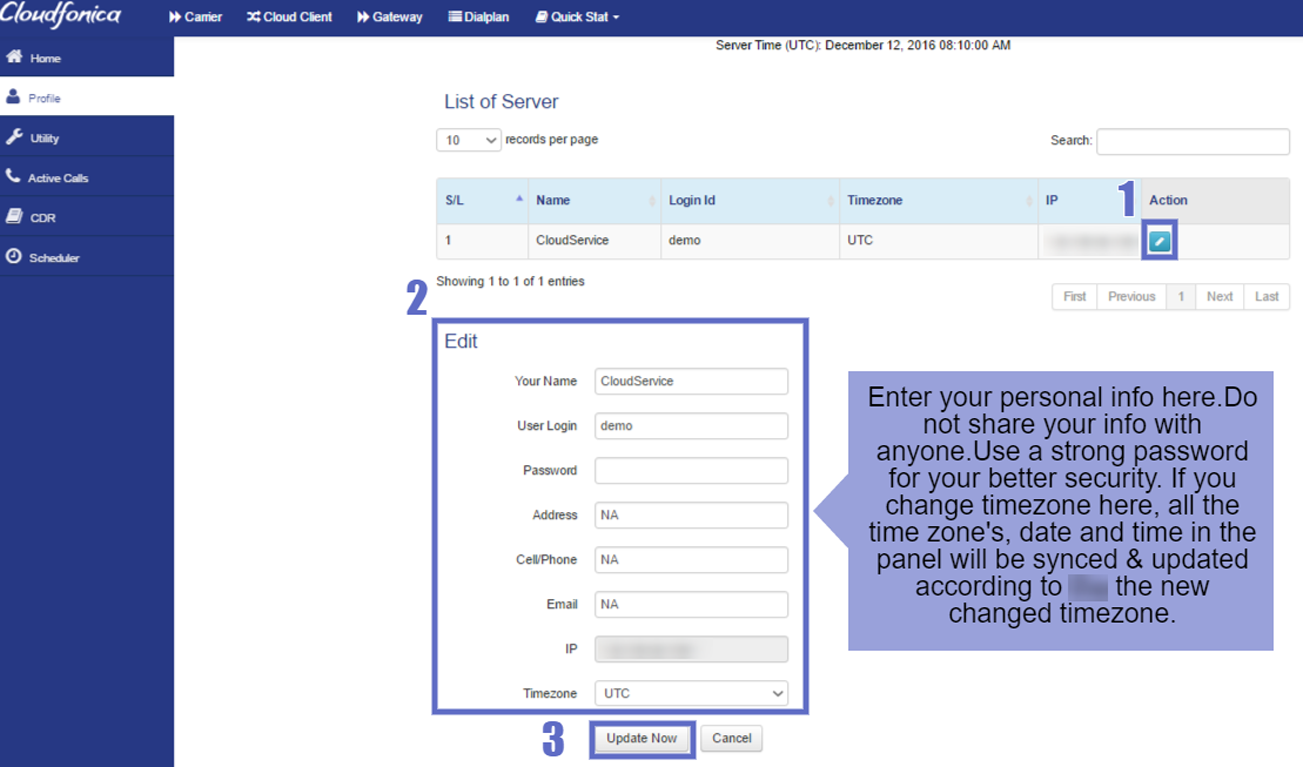
Profile:
Profile segment is an important area of Cloudfonica Client Panel v6.0.0. The most important thing is your password here. Always use a strong password and change it every week for your own security. you may also input here your name, user login address, email and timezone as per your requirement.
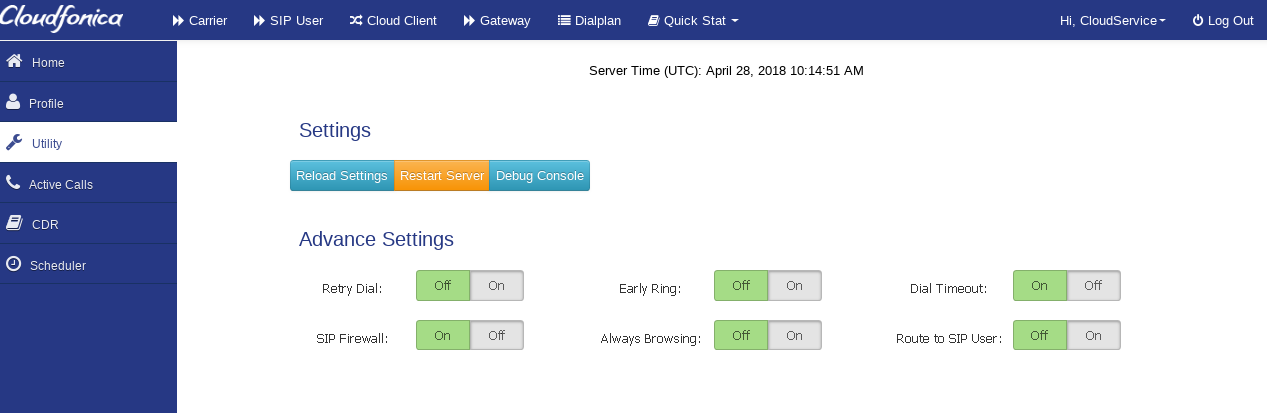
Utility:
In Cloudfonica Client Panel v6.0.0 utility segment, we have introduced some new technical features in the advanced settings section,Fig:15-16 , like:
- Retry Dial
- Early Ring
- Dial Timeout
- Sip Firewall
- Always Browsing
- Route to SIP User
also added some new features like:
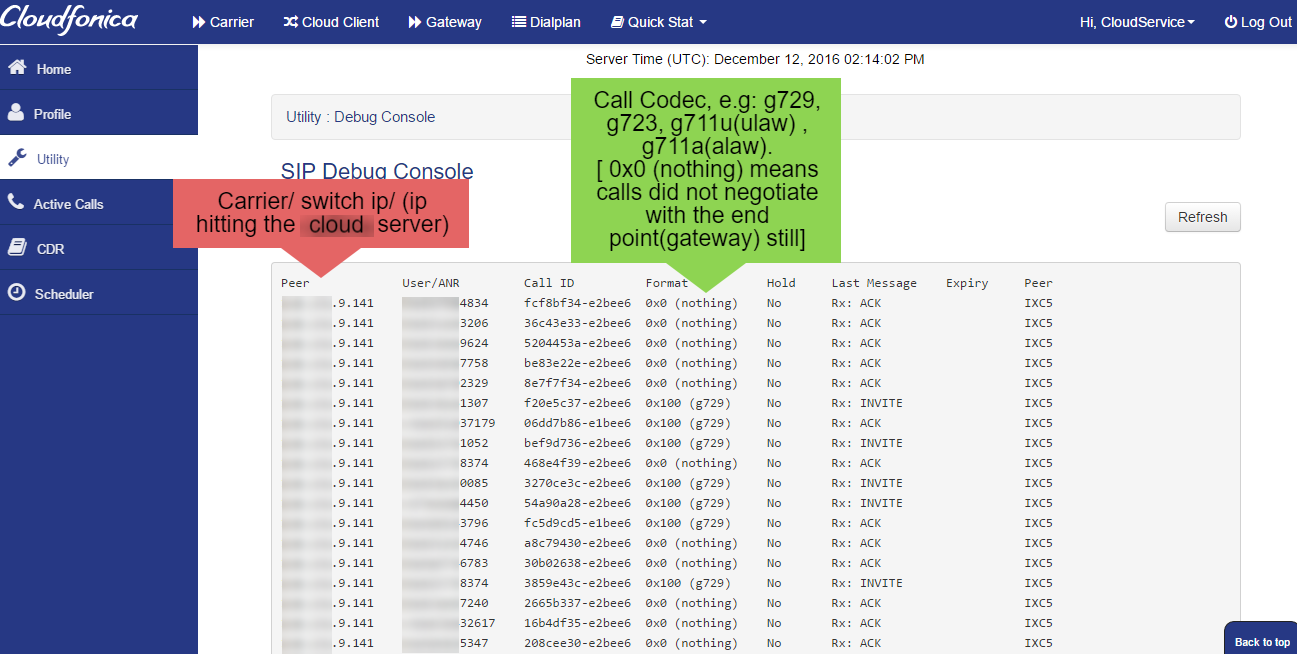
- Debug Console.
we will explain the features below:
- Retry Dial[On/Off]: when Retry dial in off, system will ring the call once then drop, whereas when retry dial is on, calls will dial the 2nd time if first attempt failed. With retry dial option on, ASR may increase a bit as well as Failed Calls may reduce if there are many with Normal Dial. Fig 19
Default Settings: Off - Early Ring[On/Off] : If early ring is on, asterisk will send immediate 183 session with a ringback tone to caller, before calle get the call, it may lower the PDD, whereas when Early ring is off, it sends the ringback tone when the call reaches to the callee.
Default Settings: off. - Dial Timeout[On/Off] : If dial timeout is off, system will not send 603 error
Default Settings:on - Sip Firewall[On/Off]: with firewall on no calls will hit without the IP listed in the carrier section, with firewall off calls may hit from other ips but will not succeed to pass the server. with this option on we may see from which ips calls are coming from debug console sections if required.Default Settings: Firewall ON.
- Always Browsing[On/Off]: Always browsing on will keep the Gateway Browsing mode on always. You have disable it manually from Gateway section. Always off option will disable the browsing mode after 30 mins from enabling the option automatically. So use this option as per your necessity. Default Settings: OFF
- Route to Sip User[On/Off]: Route to sip user option will enable the calls route to sip users, created in the Sip User section.e.g: you may create a sip user with user name & password in the Sip User section and register your gw with your cloud ip, sip user-name & password, then send calls directly to your gw (Userful for router clients who wants to use gateway in a remote location).
Default Settings: OFF.
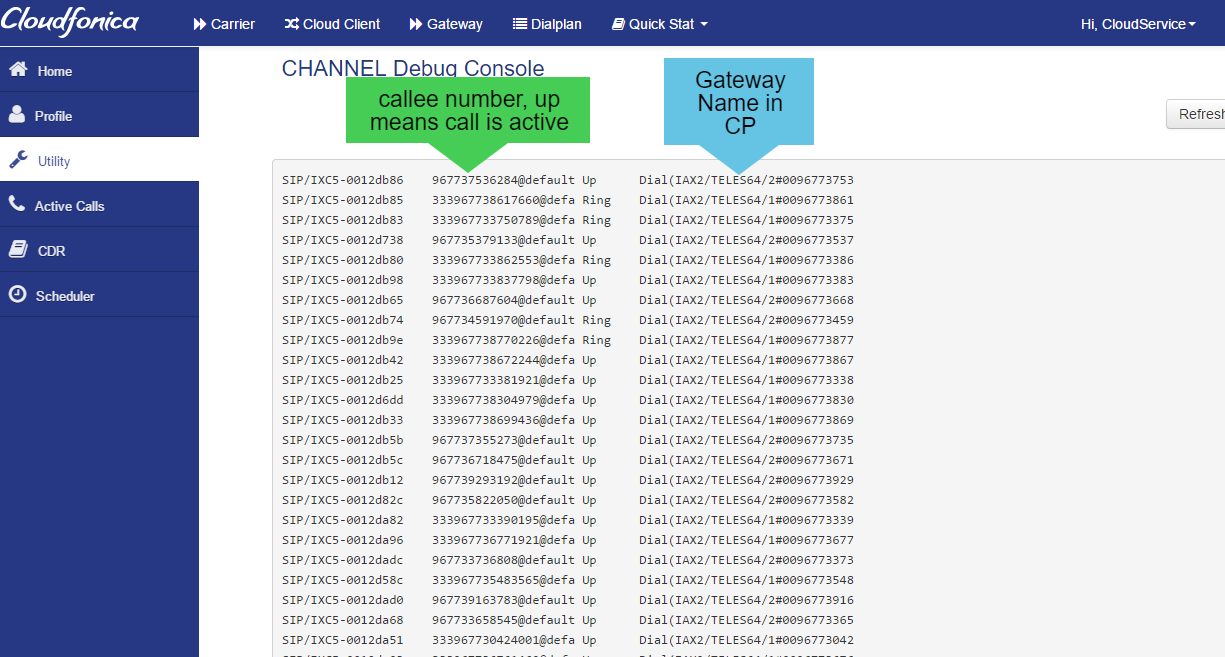
- Debug Console: From here we may see the switch end codec and from which ip’s, calls are hitting our server from, Sip debug console fig 17, channel debug console, fig: 19.
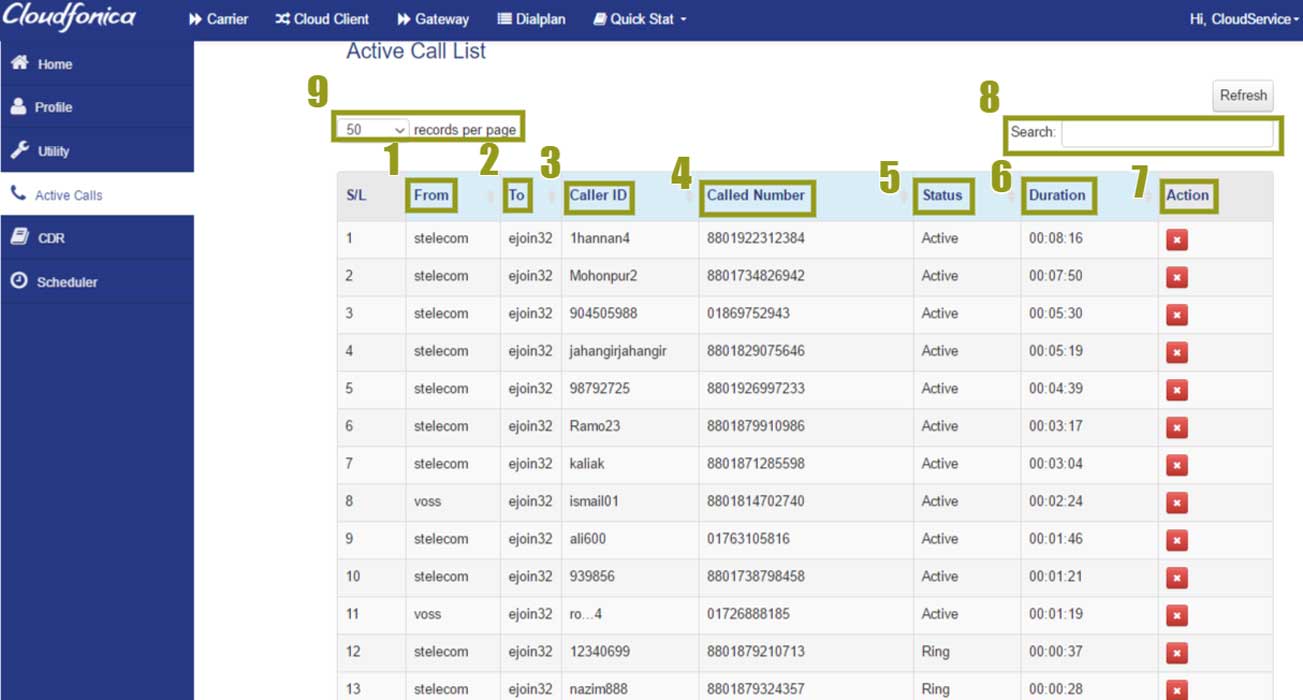
Active Calls:
In Cloudfonica Client Panel v6.0.0, you may see your active calls here. here you see:
- From: Carrier name.
- To: Gateway Name.
- Caller ID.
- Called NUmber.
- Status (Active/ Ring)
- Duration.
- Action, if you click the red cross button, the specific call will drop.
- Search, from here you may search any number or any required info showing in active calls list.
- Can select the entry capacity per page e.g: 10/ 25/ 50/ 100.
N.B. Clicking on each row heading will sort the column ascending/ descending wise.
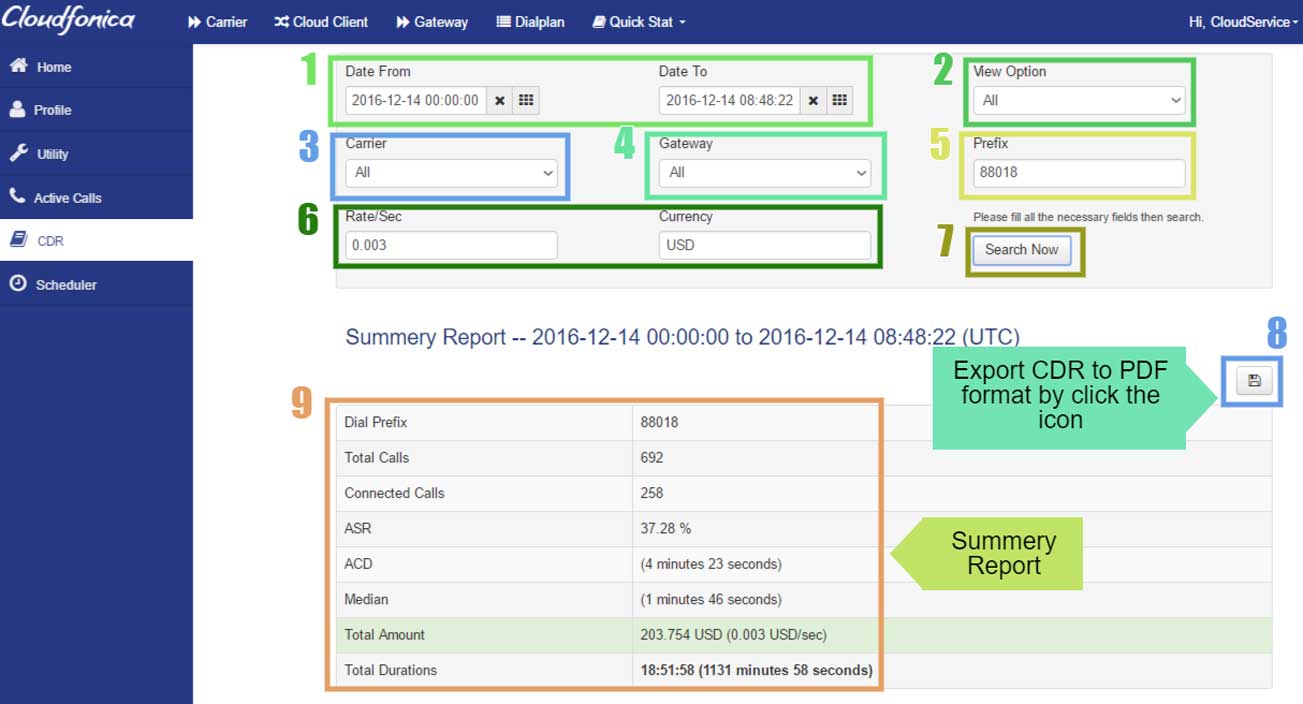
CDR:
Cloudfonica Client Panel v6.0.0 CDR is now more informative than before, with various sorting options available which are explained below and shown in figure 23:
- Choosing options of Date range is possible.
- View options are a. All(whole day average CDR), b. Hourly (per hour CDR)
- Choosing specific carrier or All.
- Choosing option for All Gateways or specific gateway.
- Choosing Prefix wise(if needed)
- Can add rate/sec and currency.(if needed)
- Search Now for the final Summary.
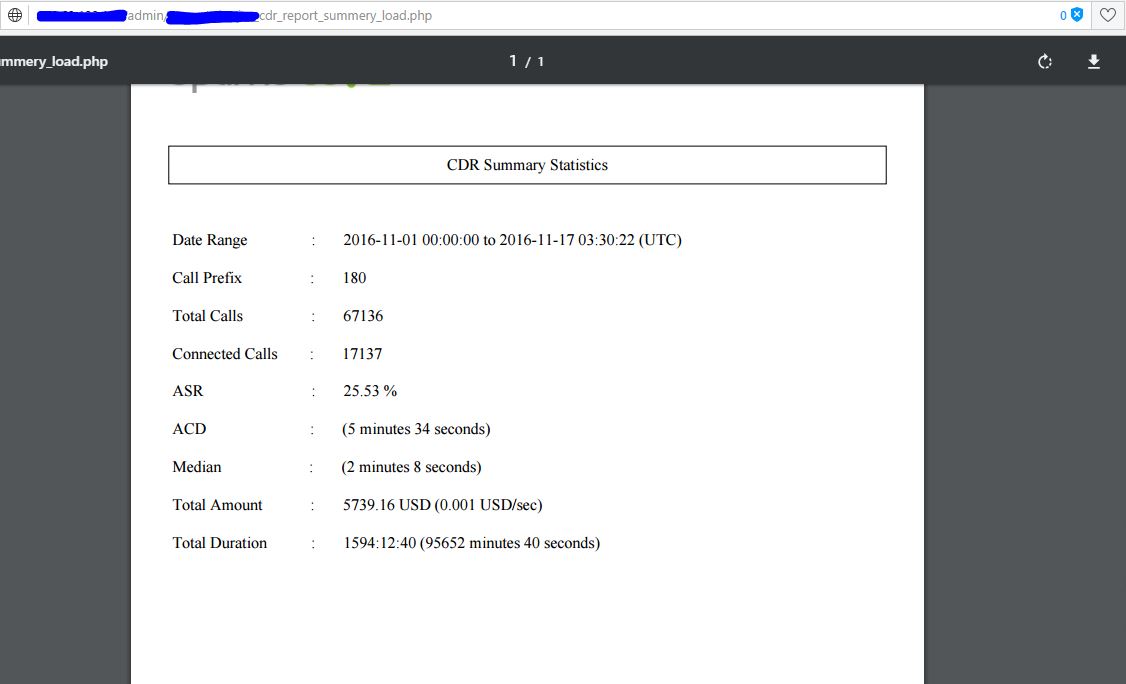
- PDF Export icon, ,clicking this will generate a PDF output of CDR which you may save in your PC/ device, shown in figure 28.
- Showing CDR summary at a glance.
- Our previous drawback was it can handle 128 ports, now there is no limitation.
Scheduler:
You said, we heard!
We have introduced the scheduled restart facility of your server or client in a scheduled time in the Saver Client Panel v6.0.0, the most advanced panel ever built!. shown on fig 26.
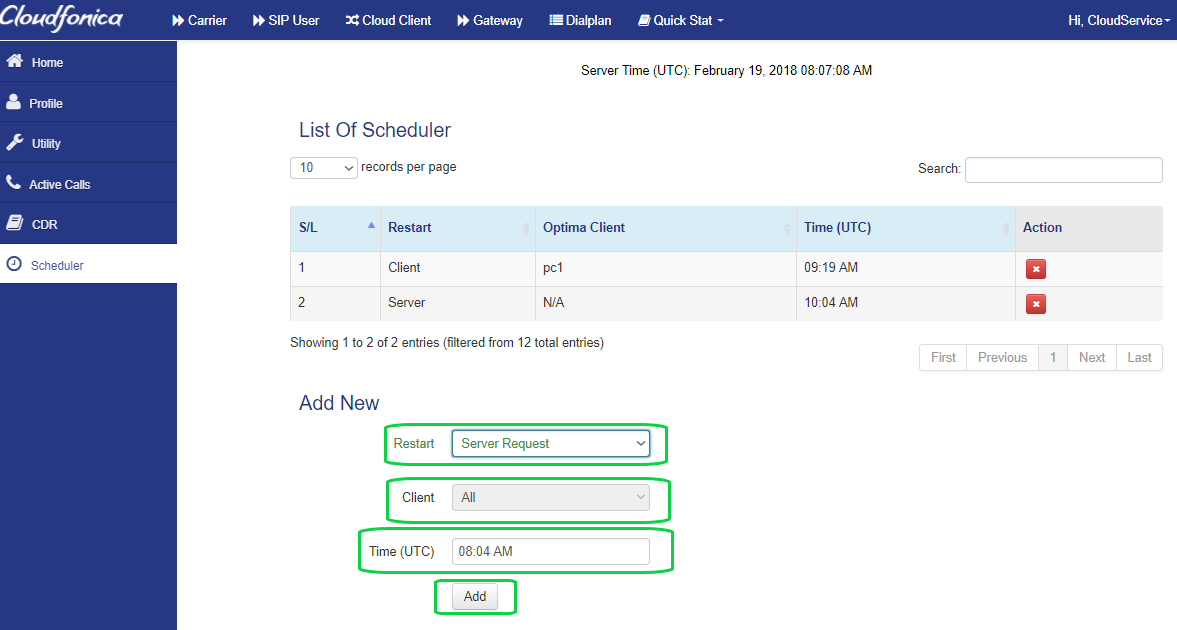
N.B: If you change the timezone in profile section then all the time zone’s will be changed in the panel as well as the time will be adjusted as per new time zone. e.g: suppose you have set the timezone as UTC and time 12:00 am, if you change the timezone in profile section as Africa/Cairo, then time will be adjusted to 2:00 AM automatically as Africa/Cairo time is UTC+2.
Glossary:
ACD – Average Call Duration.
ASR – Answer-Seizure Ratio.
CDR – Call Details Record.
Codec – Compression decompression, e.g: g729 , g723, g711u, g711a.
MAC Address – Media Access Control Address, which may consists 12 alpha-numeric/ numeric, within the range of 0 to 9 & A to F. This is known as physical address of NIC (Network Interface card) like lan card, wlan card etc.
SIP – Session Initiation Protocol, is an application layer communications protocol for signaling and controlling multimedia communication session such as voice and video calls. The most common applications of SIP are in Internet telephony, as well as instant messaging, over Internet Protocol (IP) networks.
Latency – The amount of time it takes a packet to travel from source to destination. Together, latency and bandwidth define the speed and capacity of a network.
PDD (Post Dial Delay) – Time between the last number of the called phone is pressed and the audio signal ring or the called party is heard by the caller.
Packet Loss – The losses of data in a packet based network, usually due to congestion and consequent buffer overflow. In VoIP (Real Time communication) the packets lost are not sent again and should not be over 5%.